Introduction to Welding Pipe Downhill
Mastering techniques for welding with cellulosic electrodes expands employment opportunities By NATHAN LOTT AND JAMES COLTON II Nathan Lott is account manager, ESAB Welding and Cutting Products, Hanover, Pa. James Colton II is an AWS CWI and assistant professor and co-department head, Welding Engineering Technology, Pennsylvania College of Technology, Williamsport, Pa. Reprinted with permission: The AWS Welding Journal Natural gas extraction and transmission, as well as oil and chemical processing and water transmission, require field welding API 5L line pipe in grades X42 or X52. For this thin-wall pipe, generally 0.5 in. or less, many welding procedures require downhill welding using the shielded metal arc welding (SMAW) process and cellulosic (EXX10) electrodes. Located in Williamsport, Pa., between two of the state’s largest hydraulic fracturing regions, Pennsylvania College of Technology (PCT) teaches welding pipe downhill as part of its Welding & Fabrication Engineering Technology program.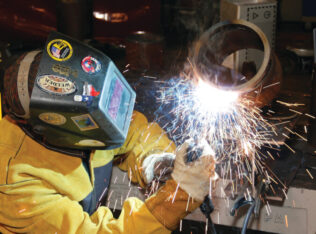 This article incorporates information from the school’s curriculum and passes on advice instructors provide to students. The figures show a 6-in.-diameter, Schedule 80 (0.4375-in.-wall) pipe. Any specific parameters or dimensions used in an actual project should always follow the supplied Welding Procedure Specifications (WPS), as well as applicable codes, such as API 1104, Standard for Welding Pipelines and Related Facilities, and ASME Boiler and Pressure Vessel Code, Section IX.
Why Downhill and EXX10?
For situations that require manual field welding, SMAW remains the preferred process because it minimizes equipment requirements and skilled operators can consistently produce sound weld beads. On thinner-wall pipe, downhill welding enables operators to run “hot and fast,” increasing productivity compared to welding uphill, which is required on thicker wall pipe to increase heat input to ensure complete penetration.
To control the molten weld pool and prevent the slag from rolling in front of the pool, downhill welding requires a “fast-freezing” EXX10 cellulosic electrode. These electrodes have a thin coating (10 to 12% by weight) that contains around 30% cellulose (wood flour) and its associated moisture content. Other ingredients include a sodium-silicate binder, titanium dioxide to create a quick-freezing slag, deoxidizers such as ferromanganese and ferrosilicon, as well as other elements that vary by manufacturer.
During welding, the heat of the arc melts the cellulose and turns it into carbon monoxide, carbon dioxide, and large amounts of hydrogen. Carbon dioxide becomes the shielding gas and hydrogen increases arc voltage to create a driving, deeply penetrating arc — a desirable characteristic when welding an open-root joint in field conditions, as well as for melting through rust and dirt in field repair applications. Cellulosic electrodes also strike easily, making them well suited for tack welds.
EXX10 electrodes produce a weld pool that wets and spreads well, yet sets up fast enough to make this electrode ideal for downhill welding techniques. The weld bead is flat with coarse ripples and covered with a thin, friable slag layer that is easily removed, which helps prevent slag inclusions when making multiple passes. As an interesting side note, the first covered electrode, patented in 1904 by Oscar Kjellberg, was of the cellulosic type.
Power Sources for EXX10
EXX10 electrodes require direct current electrode positive (DCEP) polarity and more voltage than other electrodes. Power sources designed for running EXX10 electrodes have a high open circuit voltage (OCV), which is voltage at the electrode before the arc is struck. Think of high OCV as a garden hose with the water turned on but the nozzle closed. Good electrical pressure directly relates to positive arc starts. Typical OCVs range from 60 to 90 V.
Power sources for EXX10 electrodes also have a good inductor (an inductor resists change in the electric current passing through it). Inductors act as a power reserve to keep the arc established as the operator manipulates the electrode. Direct current welding generators, with their large magnetics and smooth output, have historically set the standard for EXX10 arc performance. That said, a new generation of inverters has been designed to deliver optimal results for welding with cellulosic electrodes so that field welding applications can benefit from lightweight, portable units. These inverters feature a “cellulosic” operating mode that mimics the “drooping” volt/amp curve preferred for pipe welding. They can create a crisper, more forceful, and driving arc that benefits open root welding and EXX10 arc characteristics, plus they have an adjustable arc force function so operators can tailor the arc to match the application and personal preferences.
The Setup
Downhill pipe typically requires a 60-deg included angle, or 30-deg bevel. Compared to the 75-deg included angle or 37.5-deg bevel for uphill pipe welding (necessary to reduce slag entrapment potential when using an EXX18 electrode), the narrower angle reduces deposition requirements and improves productivity.
Depending on pipe diameter, the bevel will terminate in a 1⁄16-in. or 3⁄32-in. root face (flat) to support the heat of the arc. Operators commonly refer to these sizes as “dime” and “nickel” root face, respectively. Because welding pipe requires an open root to ensure complete penetration, WPSs require a root opening between pipe sections, with the root opening usually set the same size as the root face.
Depending on the WPS, pipe diameter, and personal preference, operators may have the flexibility to choose whether they want to set 1⁄16- or 3⁄32-in. root face and root openings, as well as use either a 1⁄8- or 3⁄32-in. electrode for the root pass. If the application allows, the authors prefer choosing a nickel root face and root opening and a 5⁄32-in. electrode because it allows flexibility if the root opening tightens as the pipe heats, cools, and contracts. If a 3⁄32-in. root opening narrows, the operator might have a wide enough opening to push the molten metal through to the backside of the joint, as well as the option to step down to a 1⁄8-in. electrode. If a 1⁄16-in. root opening tightens, there is a higher probability that the operator will need to use a grinder to open the root opening to ensure penetration.
After setting the root opening thickness, operators make four or more 1-in.-long tack welds at the 12, 3, 6, and 9 o’clock positions to maintain root opening thickness and hold the pipe in place. Note that the size of the tack weld allowed varies by pipe diameter. Tacks should be ground to bare metal and the ends feathered.
Successful pipe welding demands a good setup: concentrically align the pipe ends and ensure an even root opening around the entire circumference. If the setup is less than perfect, fix it now if at all possible.
The Root Pass: Four Key Adjustments
Set welding amperage to fall within the WPS and then match personal preferences. Typical starting points are 80 to 90 A for a 1⁄8-in. electrode and 105 to 115 A for a 5⁄32-in. electrode. Strike the arc on a tack weld at the top of the pipe, holding the rod perpendicular to the pipe. The operator will clearly hear the arc when it penetrates through the pipe, and a small “keyhole” will open behind the electrode. At this point, tilt the electrode and start traveling toward the bottom of the pipe, holding a 5- to 15-deg drag angle and moving in a straight line (e.g., no weave).
Very little arc light will be visible on the outside of the pipe. Experienced pipe welders know how to read the keyhole and make one of four adjustments to control keyhole size, which should roughly match root opening width. If the operator does not see a keyhole, that indicates insufficient penetration. To correct the situation, the operator can do one or more of the following:
This article incorporates information from the school’s curriculum and passes on advice instructors provide to students. The figures show a 6-in.-diameter, Schedule 80 (0.4375-in.-wall) pipe. Any specific parameters or dimensions used in an actual project should always follow the supplied Welding Procedure Specifications (WPS), as well as applicable codes, such as API 1104, Standard for Welding Pipelines and Related Facilities, and ASME Boiler and Pressure Vessel Code, Section IX.
Why Downhill and EXX10?
For situations that require manual field welding, SMAW remains the preferred process because it minimizes equipment requirements and skilled operators can consistently produce sound weld beads. On thinner-wall pipe, downhill welding enables operators to run “hot and fast,” increasing productivity compared to welding uphill, which is required on thicker wall pipe to increase heat input to ensure complete penetration.
To control the molten weld pool and prevent the slag from rolling in front of the pool, downhill welding requires a “fast-freezing” EXX10 cellulosic electrode. These electrodes have a thin coating (10 to 12% by weight) that contains around 30% cellulose (wood flour) and its associated moisture content. Other ingredients include a sodium-silicate binder, titanium dioxide to create a quick-freezing slag, deoxidizers such as ferromanganese and ferrosilicon, as well as other elements that vary by manufacturer.
During welding, the heat of the arc melts the cellulose and turns it into carbon monoxide, carbon dioxide, and large amounts of hydrogen. Carbon dioxide becomes the shielding gas and hydrogen increases arc voltage to create a driving, deeply penetrating arc — a desirable characteristic when welding an open-root joint in field conditions, as well as for melting through rust and dirt in field repair applications. Cellulosic electrodes also strike easily, making them well suited for tack welds.
EXX10 electrodes produce a weld pool that wets and spreads well, yet sets up fast enough to make this electrode ideal for downhill welding techniques. The weld bead is flat with coarse ripples and covered with a thin, friable slag layer that is easily removed, which helps prevent slag inclusions when making multiple passes. As an interesting side note, the first covered electrode, patented in 1904 by Oscar Kjellberg, was of the cellulosic type.
Power Sources for EXX10
EXX10 electrodes require direct current electrode positive (DCEP) polarity and more voltage than other electrodes. Power sources designed for running EXX10 electrodes have a high open circuit voltage (OCV), which is voltage at the electrode before the arc is struck. Think of high OCV as a garden hose with the water turned on but the nozzle closed. Good electrical pressure directly relates to positive arc starts. Typical OCVs range from 60 to 90 V.
Power sources for EXX10 electrodes also have a good inductor (an inductor resists change in the electric current passing through it). Inductors act as a power reserve to keep the arc established as the operator manipulates the electrode. Direct current welding generators, with their large magnetics and smooth output, have historically set the standard for EXX10 arc performance. That said, a new generation of inverters has been designed to deliver optimal results for welding with cellulosic electrodes so that field welding applications can benefit from lightweight, portable units. These inverters feature a “cellulosic” operating mode that mimics the “drooping” volt/amp curve preferred for pipe welding. They can create a crisper, more forceful, and driving arc that benefits open root welding and EXX10 arc characteristics, plus they have an adjustable arc force function so operators can tailor the arc to match the application and personal preferences.
The Setup
Downhill pipe typically requires a 60-deg included angle, or 30-deg bevel. Compared to the 75-deg included angle or 37.5-deg bevel for uphill pipe welding (necessary to reduce slag entrapment potential when using an EXX18 electrode), the narrower angle reduces deposition requirements and improves productivity.
Depending on pipe diameter, the bevel will terminate in a 1⁄16-in. or 3⁄32-in. root face (flat) to support the heat of the arc. Operators commonly refer to these sizes as “dime” and “nickel” root face, respectively. Because welding pipe requires an open root to ensure complete penetration, WPSs require a root opening between pipe sections, with the root opening usually set the same size as the root face.
Depending on the WPS, pipe diameter, and personal preference, operators may have the flexibility to choose whether they want to set 1⁄16- or 3⁄32-in. root face and root openings, as well as use either a 1⁄8- or 3⁄32-in. electrode for the root pass. If the application allows, the authors prefer choosing a nickel root face and root opening and a 5⁄32-in. electrode because it allows flexibility if the root opening tightens as the pipe heats, cools, and contracts. If a 3⁄32-in. root opening narrows, the operator might have a wide enough opening to push the molten metal through to the backside of the joint, as well as the option to step down to a 1⁄8-in. electrode. If a 1⁄16-in. root opening tightens, there is a higher probability that the operator will need to use a grinder to open the root opening to ensure penetration.
After setting the root opening thickness, operators make four or more 1-in.-long tack welds at the 12, 3, 6, and 9 o’clock positions to maintain root opening thickness and hold the pipe in place. Note that the size of the tack weld allowed varies by pipe diameter. Tacks should be ground to bare metal and the ends feathered.
Successful pipe welding demands a good setup: concentrically align the pipe ends and ensure an even root opening around the entire circumference. If the setup is less than perfect, fix it now if at all possible.
The Root Pass: Four Key Adjustments
Set welding amperage to fall within the WPS and then match personal preferences. Typical starting points are 80 to 90 A for a 1⁄8-in. electrode and 105 to 115 A for a 5⁄32-in. electrode. Strike the arc on a tack weld at the top of the pipe, holding the rod perpendicular to the pipe. The operator will clearly hear the arc when it penetrates through the pipe, and a small “keyhole” will open behind the electrode. At this point, tilt the electrode and start traveling toward the bottom of the pipe, holding a 5- to 15-deg drag angle and moving in a straight line (e.g., no weave).
Very little arc light will be visible on the outside of the pipe. Experienced pipe welders know how to read the keyhole and make one of four adjustments to control keyhole size, which should roughly match root opening width. If the operator does not see a keyhole, that indicates insufficient penetration. To correct the situation, the operator can do one or more of the following:
- Increase amperage, typically done on the fly by a welder’s helper with a remote amperage control.
- Hold a longer arc, which increases voltage and overall heat input.
- Use more of a drag angle, which pushes more heat back into the joint.
- Reduce travel speed.
- Reduce amperage.
- Increase travel speed until the keyhole reaches the correct size.
- Decrease arc length to lower voltage and “cool” the weld pool.
- Hold the electrode more perpendicular.